m |
m |
||
| Line 14: | Line 14: | ||
== winLAME Encoding Walkthrough == | == winLAME Encoding Walkthrough == | ||
| − | <div style=" | + | <div style="float:left;margin:8px;"> |
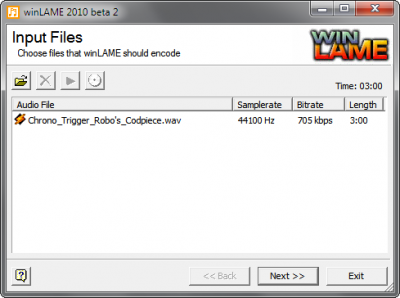
:A.) INPUT FILES: Load your WAV file into winLAME | :A.) INPUT FILES: Load your WAV file into winLAME | ||
[[image:VBR_Encoding_-_Step_1.png|400px|Step 1: Load your WAV file into winLAME]] | [[image:VBR_Encoding_-_Step_1.png|400px|Step 1: Load your WAV file into winLAME]] | ||
</div> | </div> | ||
| − | <div style=" | + | <div style="float:left;margin:8px;"> |
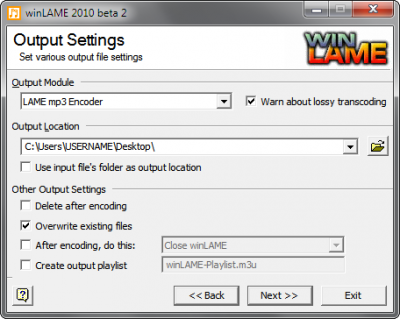
:B.) OUTPUT SETTINGS: Choose the output location where the finished MP3 should be placed | :B.) OUTPUT SETTINGS: Choose the output location where the finished MP3 should be placed | ||
[[image:VBR_Encoding_-_Step_2.png|400px|Step 2: Choose the output location where the finished MP3 should be placed]] | [[image:VBR_Encoding_-_Step_2.png|400px|Step 2: Choose the output location where the finished MP3 should be placed]] | ||
</div> | </div> | ||
| − | <div style=" | + | <div style="float:left;margin:8px;"> |
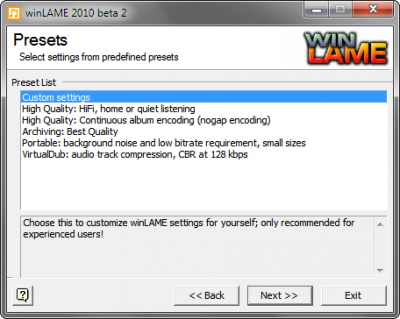
:C.) PRESETS: At the Presets list, select Custom Settings | :C.) PRESETS: At the Presets list, select Custom Settings | ||
[[image:VBR_Encoding_-_Step_3.png|400px|Step 3: At the Preset list, select Custom Settings]] | [[image:VBR_Encoding_-_Step_3.png|400px|Step 3: At the Preset list, select Custom Settings]] | ||
</div> | </div> | ||
| − | <div style=" | + | <div style="float:left;margin:8px;"> |
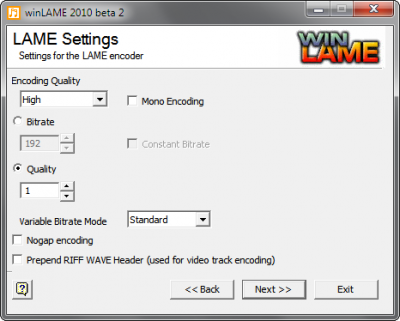
:D.) LAME SETTINGS: Select High for the encoding quality, and a quality level of 1 | :D.) LAME SETTINGS: Select High for the encoding quality, and a quality level of 1 | ||
[[image:VBR_Encoding_-_Step_4.png|400px|Step 4: Select High for the encoding quality, and a quality level of 1]] | [[image:VBR_Encoding_-_Step_4.png|400px|Step 4: Select High for the encoding quality, and a quality level of 1]] | ||
</div> | </div> | ||
| − | <div style=" | + | <div style="float:left;margin:8px;"> |
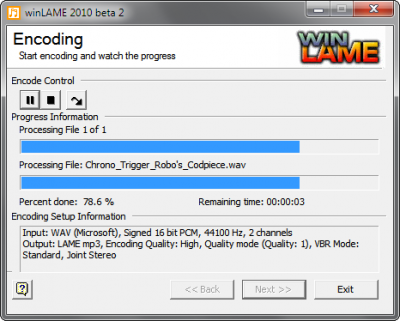
:E.) ENCODING: Underneath "Encoding Control," click the arrow/play button, and you're all set! | :E.) ENCODING: Underneath "Encoding Control," click the arrow/play button, and you're all set! | ||
[[image:VBR_Encoding_-_Step_5.png|400px|Step 5: Underneath "Encoding Control," click the arrow play button, and you're all set!]] | [[image:VBR_Encoding_-_Step_5.png|400px|Step 5: Underneath "Encoding Control," click the arrow play button, and you're all set!]] | ||
</div> | </div> | ||
Revision as of 20:17, 17 February 2012
Guidance for Encoding MP3s
Need help encoding your music? We're here to help!
- As our Submission Standards and Instructions mention, audio must be 16-bit, 44.1kHz stereo with a bitrate of either:
- 192kbps (constant or average bitrate) *OR*
- VBR1 (variable bitrate, quality = 1).
- Both of these settings produce good results; VBR1 results in higher quality, but 192kbps may be easier depending on your software or personal workflow.
- While some Digital Audio Workstations (DAWs) allow exporting a song directly to MP3, we recommend exporting to WAV and then encoding with a separate application. This allows the most flexibility and also ensures you've got a backup WAV copy of your song if you need to re-encode!
- We strongly recommend the LAME encoder; a good Windows frontend is winLAME. Additional frontends are listed at http://lame.sourceforge.net/links.php
- If your DAW supports directly exporting to MP3 and you prefer doing it that way, that's fine, just make sure it supports either 192Kbps or VBR1!!
- A walkthrough of encoding a WAV with winLAME is available below for reference.
